End to End Passport-SAML Proof of Concept with Gluu Server#
Overview#
This tutorial offers a step-by-step guide for setting up a basic proof-of-concept environment showcasing an Inbound SAML user authentication flow. Refer to general documentation describing each component for more details.
Warning
This configuration is PURELY FOR SANDBOX / POC. NO ELEMENT OF THIS DOC SHOULD BE USED IN PRODUCTION SETTINGS WITHOUT THOROUGH TESTING. If a reader of this doc uses any element in their production environment, they do so at their own risk.
If you have further questions or confusion, feel free to open ticket in https://support.gluu.org portal.
Before we begin..#
We have three servers here in this setup.
- Gluu Server 4.1 which has Passport.js. Test FQDN: "https://test41.gluu.org"
- Gluu Server 3.1.7 which will act as 'remote authentication server'. Test FQDN: "https://test317.gluu.org"
- A simple Shibboleth SP which is protecting its resource. Test FQDN: "https://testappsaml.gluu.org"
After configuration and setup, the whole flow will look like this: https://youtu.be/WnzIVSvqhRQ
Note
The Gluu Server versions can match if desired. We used an existing authentication server in this proof of concept.
Configure Passport Server ( Gluu Server )#
Install Gluu Server 4.1 while selecting:
- Install Shibboleth SAML IDP?: Yes
- Install Passport?: Yes
Configure SAML SP#
Used components#
- Shibboleth SP 3.1.0
- OS: CentOS 7
Shibboleth SP installation and configuration#
Install and configure Self Signed certificate along with Apache#
yum updateyum install httpdyum install opensslmkdir /etc/certs/yum install mod_ssl- Create a Self signed cert with command:
openssl req -x509 -nodes -days 365 -newkey rsa:2048 -keyout /etc/certs/apache-selfsigned.key -out /etc/certs/apache-selfsigned.crt -
vim -N /etc/httpd/conf.d/ssl.conf-.... .... SSLCryptoDevice builtin #SSLCryptoDevice ubsec ## ## SSL Virtual Host Context ## <VirtualHost _default_:443> # General setup for the virtual host, inherited from global configuration #DocumentRoot "/var/www/html" ServerName testappsaml.gluu.org # Server Certificate: # Point SSLCertificateFile at a PEM encoded certificate. If # the certificate is encrypted, then you will be prompted for a # pass phrase. Note that a kill -HUP will prompt again. A new # certificate can be generated using the genkey(1) command. SSLCertificateFile /etc/certs/apache-selfsigned.crt # Server Private Key: # If the key is not combined with the certificate, use this # directive to point at the key file. Keep in mind that if # you've both a RSA and a DSA private key you can configure # both in parallel (to also allow the use of DSA ciphers, etc.) SSLCertificateKeyFile /etc/certs/apache-selfsigned.keyapachectl configtest -
Check if mod_headers enabled or not:
[root@ip-xxxx ~]# httpd -t -D DUMP_MODULES | grep header headers_module (shared) [root@ip-xxxx ~]# -
service httpd restart -
Test your Apache and cert with
https://testappsaml.gluu.orgin a web browser. You should get the Apache2 default page.
Install Shibboleth SP#
-
Configure Shibboleth SP:
-
Prepare repo:
- Create a file named "Shib_SP.repo" inside
/etc/yum.repos.d - Add below snippet there
[shibboleth]
name=Shibboleth (CentOS_7)
# Please report any problems to https://issues.shibboleth.net
type=rpm-md
mirrorlist=https://shibboleth.net/cgi-bin/mirrorlist.cgi/CentOS_7
gpgcheck=1
gpgkey=https://shibboleth.net/downloads/service-provider/RPMS/repomd.xml.key
        https://shibboleth.net/downloads/service-provider/RPMS/cantor.repomd.xml.key
enabled=1
yum update
- Create a file named "Shib_SP.repo" inside
-
yum install shibboleth.x86_64 -
Generate the cert and key for Shibboleth SP:
-
cd /etc/certs/ openssl genrsa -des3 -out sp.key 2048openssl rsa -in sp.key -out sp.key.insecuremv sp.key.insecure sp.keyopenssl req -new -key sp.key -out sp.csropenssl x509 -req -days 365 -in sp.csr -signkey sp.key -out sp.crt-
vim -N /etc/shibboleth/shibboleth2.xml -
Add your SP name here:
- Add the location of SP key and cert like below:<ApplicationDefaults entityID="https://testappsaml.gluu.org/shibboleth" REMOTE_USER="eppn subject-id pairwise-id persistent-id" cipherSuites="DEFAULT:!EXP:!LOW:!aNULL:!eNULL:!DES:!IDEA:!SEED:!RC4:!3DES:!kRSA:!SSLv2:!SSLv3:!TLSv1:!TLSv1.1">-<!-- Simple file-based resolvers for separate signing/encryption keys. --> <CredentialResolver type="File" use="signing" key="/etc/certs/sp.key" certificate="/etc/certs/sp.crt"/> <CredentialResolver type="File" use="encryption" key="/etc/certs/sp.key" certificate="/etc/certs/sp.crt"/>service shibd restart-service httpd restart
Connect Shibboleth SP with Gluu Server#
- Download your Gluu Server's metadata
shibboleth2.xmlconfiguration. Location:/etc/shibbolethin SP server:-
Provide your Gluu Server's address like below:
- Assuming your Gluu Server's metadata is downloaded in same directory ( /etc/shibboleth/ ):<SSO entityID="https://test41.gluu.org/idp/shibboleth" discoveryProtocol="SAMLDS" discoveryURL="https://ds.example.org/DS/WAYF"> SAML2 SAML1 </SSO>-<MetadataProvider type="XML" file="test41_gluu_org_metadata.xml"/>service shibd restart-service httpd restart
Create and configure sample protected page#
yum install epel-releaseyum install phpmkdir /var/www/html/securetouch /var/www/html/secure/index.php- Edit index.php, add this sample script:
<html>
<head><title>Shibboleth test</title></head>
<body><pre><?php print_r($_SERVER); ?></pre></body>
</html>
- Restart shibd and httpd again.
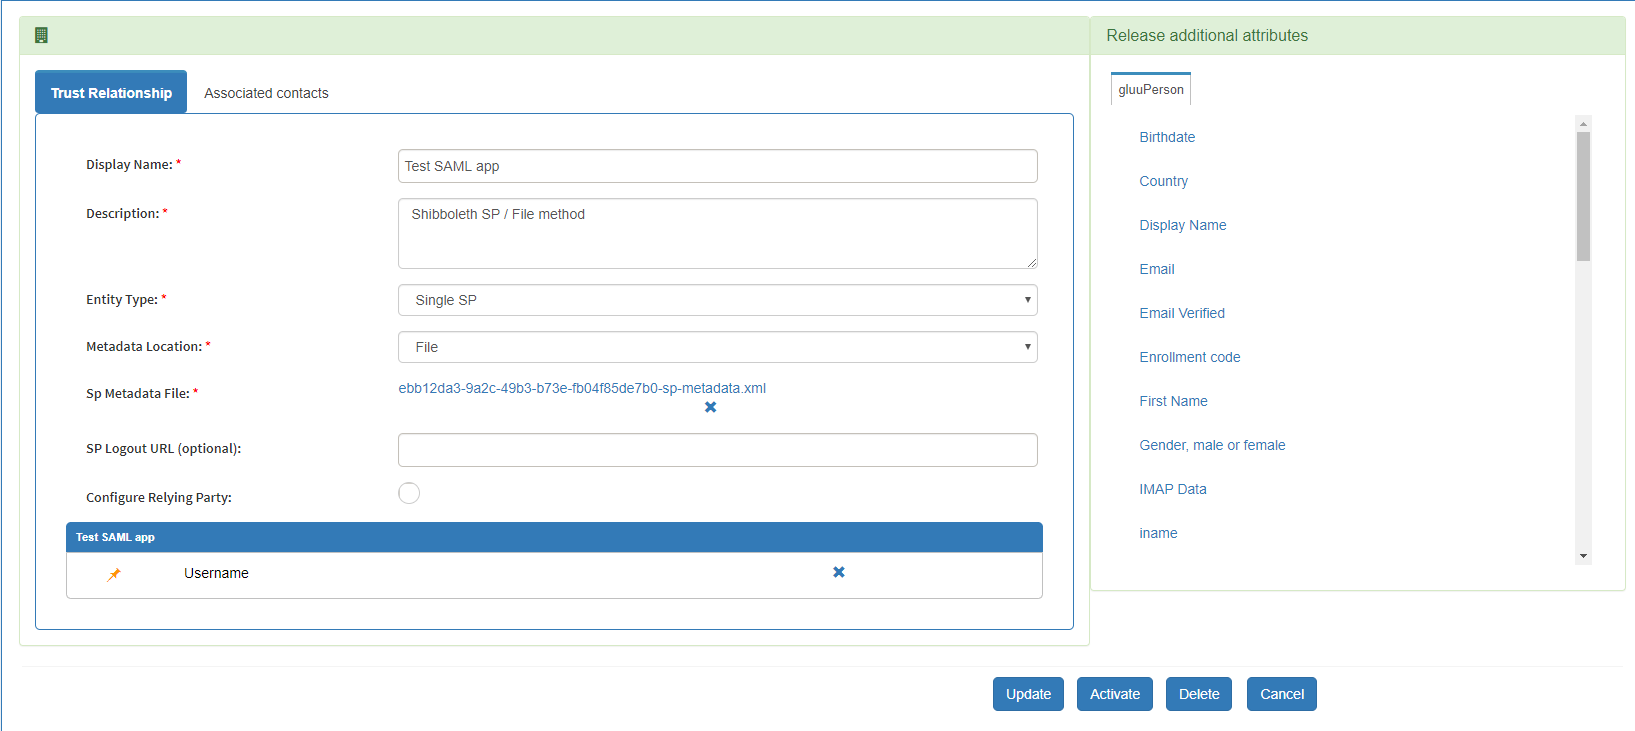
Connect Gluu Server with Shibboleth SP#
- Grab your Shibboleth SP's metadata. Shibboleth SP metadata can be loaded by calling this URL:
https://testappsaml.hostname/Shibboleth.sso/Metadata - Create a trust relationship like below.
Test SSO#
- Point your browser to
https://testappsaml.gluu.org/secure/index.php. If everything goes well, you will be redirected to your Gluu Server, after successful authentication you will land in to SP's 'Environment Variable' page.
Configure Passport Server#
Enable Passport:#
As we installed 'Passport' during the installation of Gluu Server, Passport and itss required scripts are already enabled.
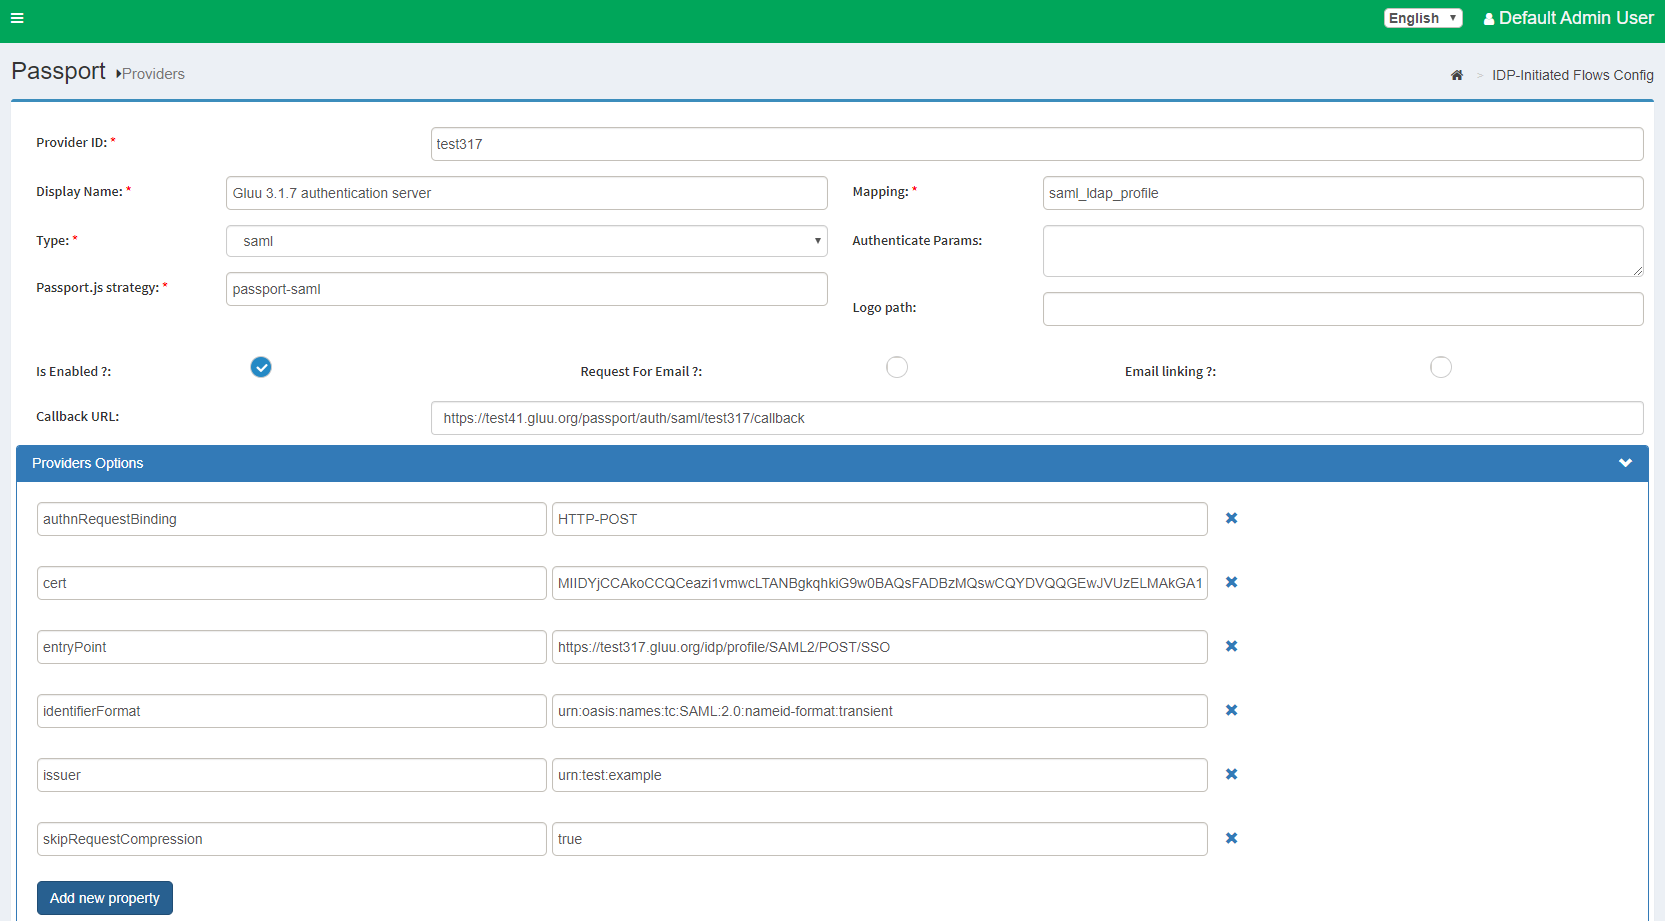
Configure SAML authentication strategy in Passport#
- From oxTrust, go to
Passport>Providers - Hit "Add New Provider"
Provider ID: anything you can recognize.Display Name: same .. anything you / your end user can recognizeType: Selectsaml-
Most of the box will be automatically populated and new option list will appear below where you have to put some information of your remote authentication server. In our case, our remote authentication server is a Gluu Server 3.1.7.
entryPoint:https://test317.gluu.org/idp/profile/SAML2/POST/SSOidentifierFormat:urn:oasis:names:tc:SAML:2.0:nameid-format:transientauthnRequestBinding:HTTP-POSTissuer:urn:test:examplecert: The IDP's public PEM-encoded X.509 certificate used to validate incoming SAML responses. Include only the body of the certificate: suppress the BEGIN CERTIFICATE and END CERTIFICATE lines, any whitespace, and all line breaking characters (new line/carriage return). As for example if your remote IDP is another Gluu Server, you need to grab the idp-signing.crt from that server. Command can be used:cat /etc/certs/idp-signing.crt | grep -v '^---' | tr -d '\n';skipRequestCompression:true
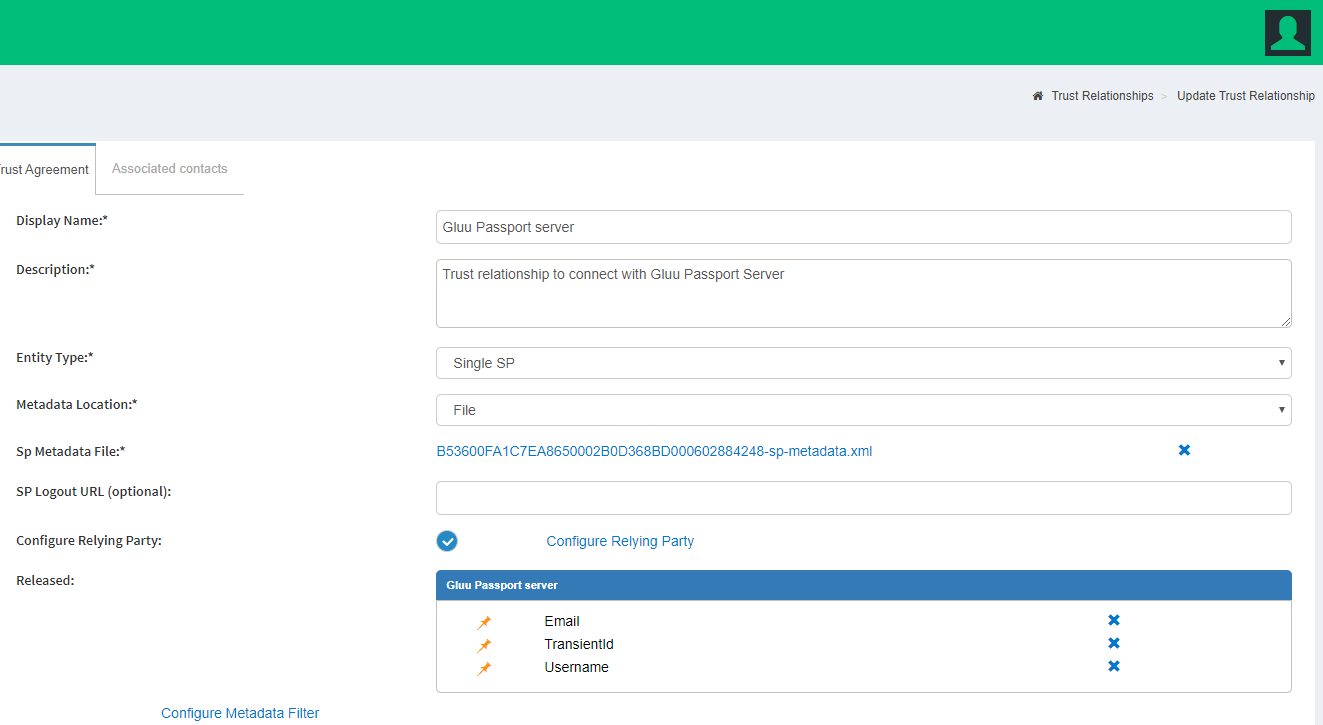
Configure Remote Authentication Server#
Passport will automatically generate SP metadata for every enabled IDP that is added through the admin UI. The next step is to register this metadata at every external IDP.
Metadata can be accessed in a browser at https://[your-gluu-host-which-has-passport]/passport/auth/meta/idp/[PROVIDER-ID] where "PROVIDER-ID" is the identifier assigned to the IDP added. For our case it will be https://test41.gluu.org/passport/auth/meta/idp/test317
In oxTrust for the Gluu-passport server, navigate to Passport > Providers and see the ID column in the providers table. Metadata can also be found in the Gluu chroot under /opt/gluu/node/passport/server/idp-metadata.
Registering metadata contents at remote IDPs is a process that may differ across IDP implementations. As an example, when the remote IDP is another Gluu Server, a trust relationship should be created. Review the corresponding documentation for your IDPs.
Test Passport-SAML#
Now it's time to test our Passport-SAML workflow....
Work in Gluu-passport Server ( test41.gluu.org )#
Change Authentication method: Configuration > Manage Authentication > Default Authentication Method tab: select "passport_saml". And "Update" configuration.
Work in Remote Authentication Server ( test317.gluu.org )#
Make sure to create a sample user. We are not going to use 'admin' for testing SSO.
Finally...#
Hit https://testappsaml.gluu.org/secure/index.php and you will see rest like already shared video.